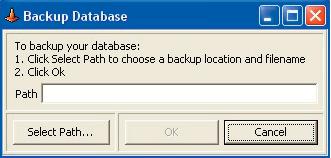
Backup a Database
JobSite™ 2 Software gives you an option to manually save a backup of your database file. With this option you can choose the location and name for your backup file.
1. Click the Database drop-down item and select Backup from the list.

2. When the Backup Database dialog is displayed, click the Select Path button.
3. When the Backup To... form is displayed, use the Save In drop-down to identify the location for your backup file.
4. Enter a name for the backup file by typing it into the File Name field, selecting from options in the drop-down list or highlighting a file from the displayed file list. Selecting a file from the list or a file name from the drop-down list will overwrite the file when the backup is saved.

The File Type drop-down option cannot be changed.
4. Click the Save button to save a backup copy of the JobSite 2 database file. If a backup copy already exists, you will be asked if you want write over the existing copy.
5. Click OK at the Backup Database dialog to complete the backup operation.
Restore a Database
The Restore function should be used with caution as it will overwrite the current JobSite™ 2 database. If you are unsure or have any questions, please contactThis email address is being protected from spambots. You need JavaScript enabled to view it. before attempting to restore a backup database file.
1. Click the Database drop-down item and select Restore from the list.

2. When the Restore Database dialog is displayed, click the Select Path button.
3. When the Restore From... form is displayed, click the File Name drop-down and select the preset option: C:\Program Files\JobSite2\Data\AutoBackup\JobSite 2 AutoBackup 958241476.j2d.

The File Type option cannot be changed.
4. Click the Open button to complete the file selection process.
5. At the Restore Database dialog, click OK to complete the restore operation.
NOTE: Once the restore operation is completed, it cannot be undone.
Help Us Improve!
While perusing our support articles, if you find an article confusing or you feel it could be written better, just click add a comment and leave your concerns.
Our Customer Service department will attempt to address your concerns as soon as possible. Thank you for helping JTECH help you☺

 Very helpful
  Could be better
  Not helpful
Add a Comment